


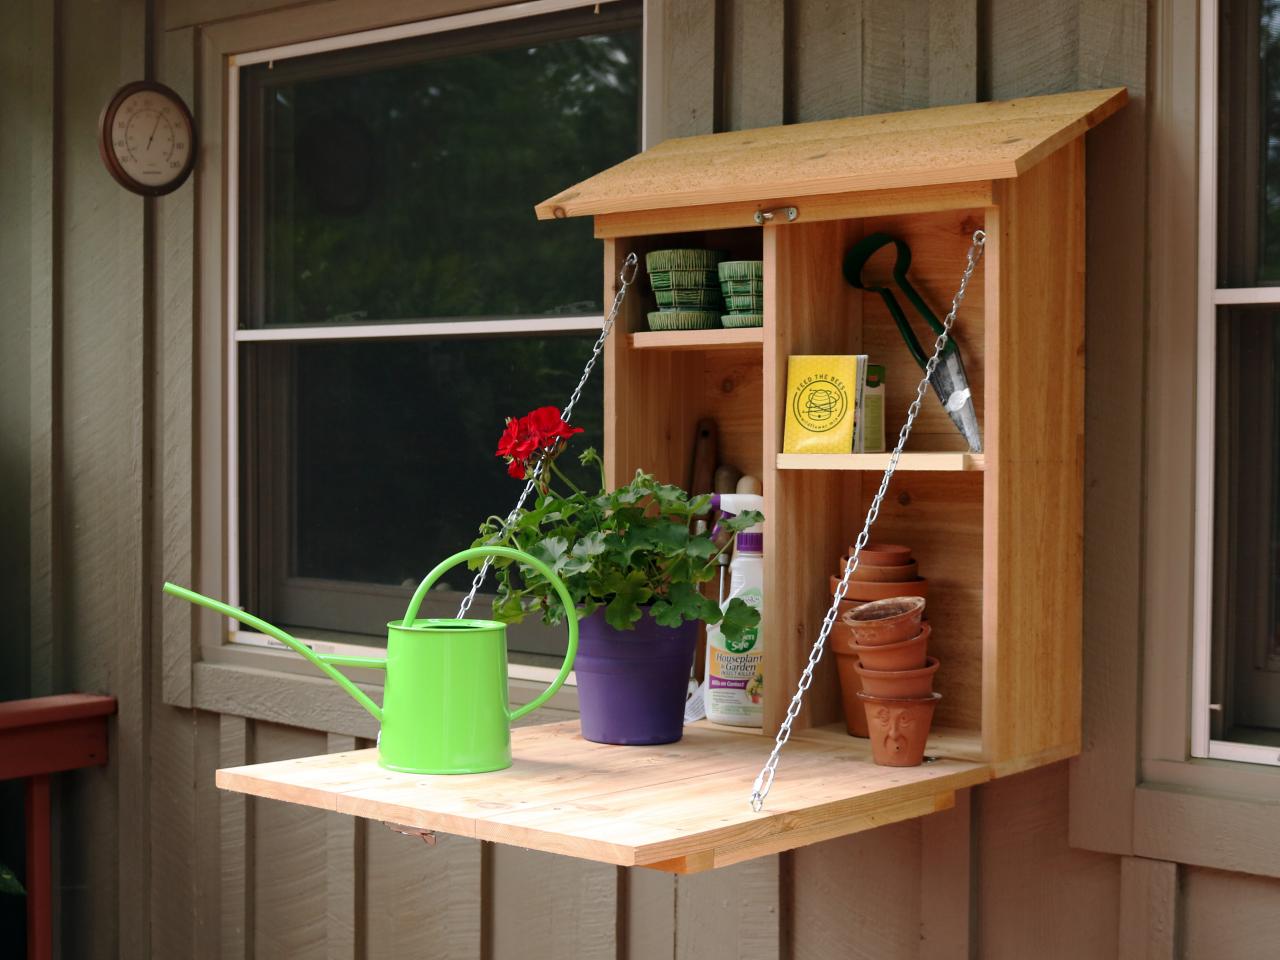
How to Make a Fold-Down Outdoor Cabinet
This fold-out cabinet is perfect for storing garden supplies or barbeque tools. When guests come over, clear out the gear and use the cabinet as a serving bar or buffet.

Jacquelyn_McGilvray
We used cedar to make our outdoor cabinet because it is exterior-grade so it’ll last a long time and stand up to the weather; plus it looks and smells great.
Tools and Materials
- (3) 1x8 x 8’ cedar
- (1) 1x2 x 8’ cedar
- window latch
- galvanized chain
- (4) eye hooks
- (4) closeable rings
- (2) hinges
- 1-1/4” exterior screws
- 1-1/2" finish nails
- miter saw
- table saw or circular saw
- tape measure
- carpenter's square
- drill with 1/8" bit
- French cleat
Project Plans


Step 1: Cut Vertical Pieces
To make the two vertical sides pieces and the vertical center divider, cut one of the 1x8s into three pieces 28-1/4” long. The roof of the cabinet is slanted, so make the bottom end of the boards straight and cut the top end at a 22.5-degree angle. (The tall side of the angled pieces will be 28-1/4” and the short side will be 25-1/2".) If using cedar, make the cuts so the rough side of the wood is facing out. Label each piece as you cut; “B” for bottom, “T” for top, etc.
Pro Tip: When making a cross-cut on thin lumber using a sliding miter saw, skim the saw across the top of the wood about 1/8” deep then go back and cut through the rest of the wood. This prevents the wood from tearing and splintering.
Pro Tip: Square up the edges on the factory cuts and pull out the staples for a clear cut that is perfectly square.
Pro Tip: Cut the longest length first so if you mess up you will have some shorter lengths to work with.

Step 2: Cut Bottom and Back Pieces
The bottom piece of the cabinet should be 21-3/4”. The four back pieces will lay horizontally across the back of the frame, so cut them to 21-3/4” as well.

Step 3: Cut Middle Shelf Pieces
If you are adding inner shelves to your cabinet, go ahead and cut them now. But plan on installing it after the other pieces are fastened together.
Step 4: Cut Roof Pieces
We used two pieces of wood to make the slanted roof — one full-size 1x8 and one 1x8 ripped in half lengthwise — you could also use a 1x12, but that size is not often available at big-box retailers. Cut both pieces to 26-3/4” so the roof will overhang the cabinet 2-1/2” on each side. Cut an additional 1x2 to 21-3/4” for the filler piece that will sit below the roofline and above the door.
Step 5: Test the Fit
Assemble the pieces but do not fasten at this point. Just make sure they fit together.


Step 6: Lay Out Door
The door size is 23” tall x 21-3/4” wide. Cut the 1x8s into three pieces at 23” long. Cut two 1x2 pieces at 21-3/4”; these are the horizontal decorative pieces for the outside of the door, the vertical 1x2 pieces will be cut later. For the 1x2 placement, make a hash mark on the edge of the 1x8s that is 3 inches up from the bottom then one 3 inches from the top (Image 1). Center the cut 1x2s on the hash marks, on top of the three boards, and continue the hash mark onto the 1x2s so you’ve got them lined up exactly where you want them (Image 2). Flip over the entire door assembly — remove the 1x2s and turn them over so the outer pieces are facing down. Lay the three 1x8s face down and perpendicular on top of the two 1x2s. Align the hash marks. Use a straight edge to draw a pencil across the back so that you know where to insert the screws (Image 3).


Step 7: Assemble Door
Insert one screw on the four corners, one each on each edge of the 1x2s (Image 1). Double-check that everything is aligned by measuring corner to corner — they should be equal (Image 2). Use a knife to add a slight gap in between the pieces in case the wood expands over time (Image 3). When everything is squared up, finishing screwing the 1x8s to the 1x2s (Images 4 and 5).
Pro Tip: Cedar is usually soft enough that you don’t need to predrill. But if you are using another type of wood, you may want to predrill to prevent the wood from splitting. On this project, we predrilled screw and nail holes when they were close to an edge.


Jacquelyn_McGilvray
Step 8: Attach Sides + Bottom
Stand the bottom and two side pieces of the cabinet together on a work surface. Clamp one side to the bottom piece (Image 1) and predrill using a 1/8' bit through the bottom and into the side piece (Image 2) and then insert the screws. Repeat for the other side piece (Image 3). Four screws per side should suffice.


Step 9: Install Inner Shelf
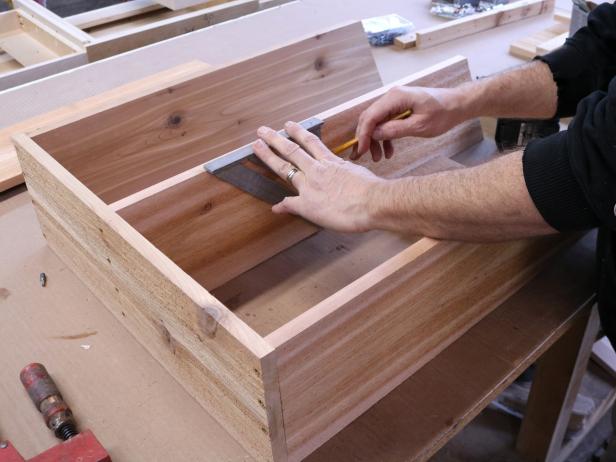
Start with the center vertical divider. We placed ours in the center of the cabinet. Find the center point on the bottom piece and mark it with a line using a speed square (Image 1). Clamp the vertical shelf piece to the bottom of the cabinet (Image 2). Predrill the holes through the bottom piece then insert the screws. Four screws should suffice.
For the horizontal shelf, we used nails instead of screws because the sides will be visible. Use a carpenter's square to mark the placement of the shelf (Image 3). Clamp it in place, predrill the holes then hammer in nails to hold it in place (Images 4 and 5).
If you’re adding a shelf to the other side of the divider, measure the space for the width of the shelf and cut it accordingly. Mark for placement within the cabinet then nail it into place.


Jacquelyn_McGilvray
Step 10: Attach the Back
Lay the four the 23-1/4” 1x8s horizontally across the back of the cabinet (Images 1 and 2). If you’re going to predrill, just do it through the back pieces. Insert screws from the back along the sides and bottom of the cabinet (Image 3).

Jacquelyn_McGilvray


Step 11: Attach the Door
Lay the cabinet face up on your work surface and lay the door in place (Image 1). If your door is out of square, use a straight edge to make a straight mark (Image 2), then either sand or use a circular saw to even it up. Next, stand the cabinet upright with the door in the open position. Lay a piece of 1x scrap material underneath the cabinet so it will sit even with the door (Image 3).
Determine and mark the placement of the hinges. Hold the hinges in place and use a pencil to trace the holes (Image 4). Predrill the screw holes about 3/8” deep for the hinges, but don’t go all the way through the wood. Secure the hinges with screws (Image 5).


Jacquelyn_McGilvray

Step 12: Add Door Chain

Jacquelyn_McGilvray

Jacquelyn_McGilvray

Jacquelyn_McGilvray

Jacquelyn_McGilvray

Chains connecting the door to the cabinet will help steady the door and allow for extra weight when it is open. On the inside of the cabinet, insert the eyebolt 3 inches down from the end and 3/4 of an inch in from the edge on each side (Image 1). On the door of the cabinet, insert the eyebolts 8 inches from the top of the door and 1 inch in from the sides (Image 2 and 3). (If the eyehook protrudes through the other side of the door, we’ll explain how to cover that in a later step.) Insert the end of the chain into one of the closable rings then hook the ring onto one of the eyehooks and close the ring (Image 4). Pull the chain taut to the other eyehook and determine the necessary length to attach it to make the connection. Cut the chain with dike cutters or wire cutters and attach all the pieces (Image 5). Repeat for the other side of the cabinet.
Step 13: Cut Notch for Chain
You will need to cut a notch in the shelves to accommodate the chain when the door is closed. Use a razor saw to make a small notch – about 1” square – at the outside of each shelf (Image 1). Then use a chisel to knock out the small piece of wood (Image 2).


Jacquelyn_McGilvray
Step 14: Make Filler Piece


Jacquelyn_McGilvray
The roof of our cabinet is slanted with an overhang, so we added a filler piece to sit underneath the roof and above the door. The filler piece will also hold the latch for the door. Cut a 1x2 the width of the cabinet door (21-3/4”). Lay the cabinet on its back and close the door. Set the filler piece above the door and predrill for nails into the vertical walls (Image 1). (We’re using nails because this joint will be visible.) Hammer the finish nails into the predrilled holes (Image 2).
Step 15: Attach Roof
For the roof, we used one 1x8 and one 1x8 ripped in half. You could also use a 1x12. Cut both pieces to 26-/34” so the roof will overhang the cabinet 2-1/2” on each side (Image 1). Use the ripped 1x8 as the back part of the roof and the full 1x8 on the front. Predrill the wood into the three vertical sections to avoid splitting (Image 2). Nail the split 1x8 onto the vertical sections. To create a tight seal between both sections of the roof, apply a bead of construction glue to the end of the 1x8s (Image 3). Attach the full 1x8 to complete the roof covering (Image 4).

Jacquelyn_McGilvray


Jacquelyn_McGilvray

Step 16: Install Door Latch
To keep the door shut, install a latch that connects the door with the filler piece above the door. We used a simple window latch. Center the latch in the middle of the door and the filler piece, and use the hardware that came with the latch to install it.


Step 17: Cover Bolts on Door
To cover the eyehook hardware that protruded through the outside of the door use an additional 1x2 with a hole drilled out to conceal it. Measure the distance between the two horizontal 1x2s on the door and then cut two 1x2s to that size. Make a mark on the underside of the 1x2 where you need to drill in order to cover the hardware. We used a 1/2” bit to make the hole. When you have the fit just right, nail the board into place.

Step 18: Add Hanging Hardware
We chose to use a French cleat to hang our cabinet so it can be removed easily from the wall if necessary.

Jacquelyn_McGilvray


Jacquelyn_McGilvray

Jacquelyn_McGilvray


