


How to Refurbish a Gas Grill
Don't throw away your old gas grill, learn how to make it work and look like new again by replacing the burners, grates and more. Plus, find tips and tricks for removing rust and grease.

After


Before
Parts You Can Replace or Upgrade

Most home stores carry a selection of parts for gas grills, everything from new electric igniters to propane regulators. All of these can easily be installed by the average DIYer. The most common points of wear for gas grills are the burner tubes, burner shields, cooking grates, thermometer, electric igniter and the propane regulator.

Tools and Materials
- hand tools: pliers, wrenchs + screwdrivers
- wire brush
- angle grinder with various attachments
- safety gear: gloves, goggles + respirator
Step 1: Disconnect Propane (VERY IMPORTANT)

Before you go any further, the most important thing you need to do is disconnect the propane tank. Close the valve on the tank, unscrew the regulator and move the tank outdoors and as far from your work area as you can. Propane should not be stored in enclosed areas and should not be anywhere near any type of ignition source.
Step 2: Turn Off Gas Valves + Remove Control Panel

After you’ve disconnected the gas and stored the tank, make sure that you’ve turned the control knobs to the off position. Then, remove the knobs and the control panel to gain access to the gas valves and ignition switch.
Step 3: Remove Regulator, Igniter + Valves
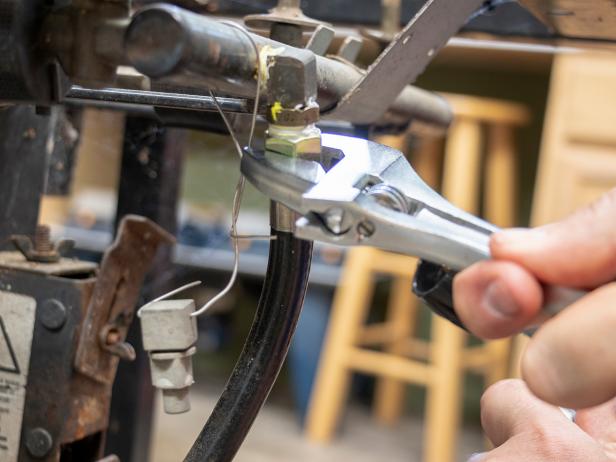

Use an adjustable wrench to remove the old propane regulator hose. It’s a good idea to move this out of your work area. Leave it outside for a little while to allow any residual gas to dissipate then you can discard it safely.
After the control panel has been removed, you should be able to remove the electric igniter and the gas valves. This might vary a little depending on your grill model, but should be fairly straightforward. Hang on to the gas valves and inspect them for damage. If they are in good condition, clean them up and reuse them.
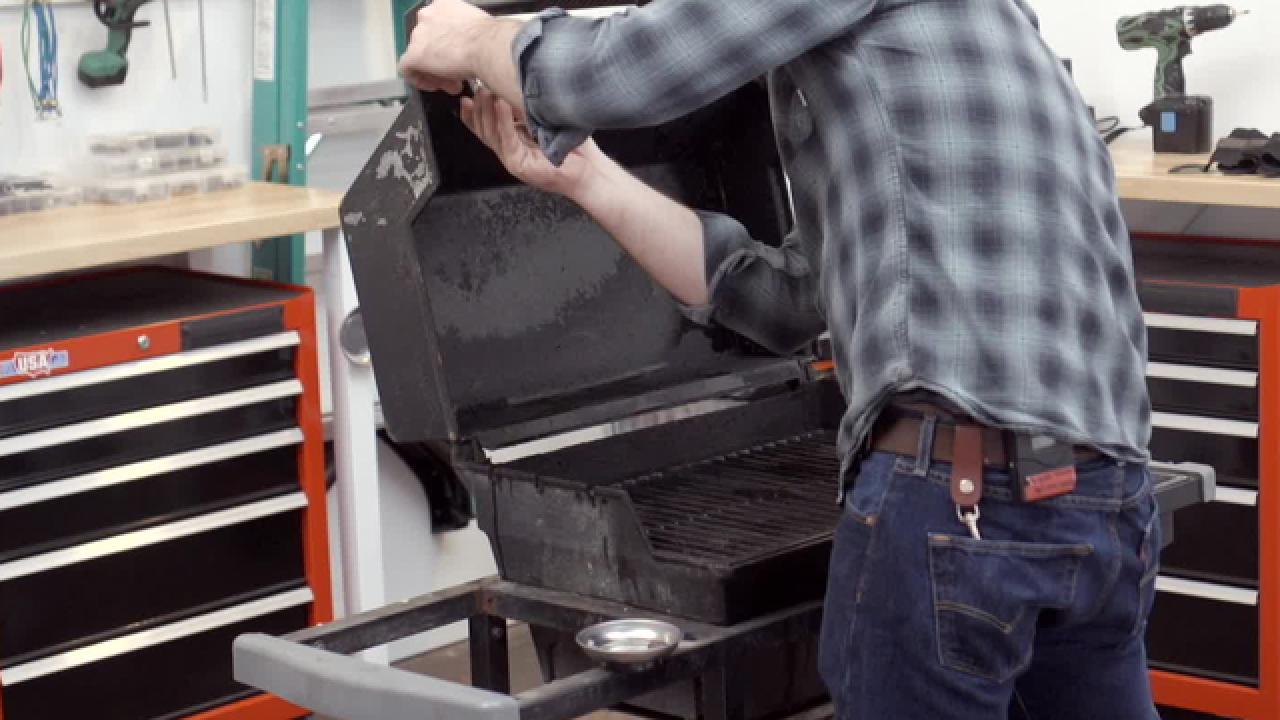
Step 4: Remove Accessories + Drip Pans

Now that your gas elements have been removed, you can start breaking your grill down to its basic parts. Remove any exterior accessories that will interfere with cleaning and painting your grill. Make sure to carefully label all the hardware and keep the parts organized so you can easily reassemble the grill. It helps to take pictures as you work so you can remember where things go during re-assembly.
Step 5: Remove Grates + Burner Tubes


Open the lid and start removing the cooking grates. If yours are still serviceable, clean them with soapy water and a wire brush. If yours are too far gone (like ours), you can discard or recycle the old ones and replace them with new ones.
With the cooking grates and the burner guards out of the way, you can now remove your old burner tubes. Since you’ve come this far, it’s highly recommended that you replace your old burner tubes. Having new burners and burner guards will really make your grill work like new.
Step 6: Degrease


Your grill accumulates an incredible amount of char and grease over the years. Depending on how old your grill is, and where you’ve stored it, you might be able to clean the insides with a simple wire brush and a little effort. Try to avoid spraying your grill with water as it only encourages more rust and makes a huge mess.
If your grill has more grime than you can possibly muscle off, an angle grinder with a brush attachment will give you the power you need to clean your grill back to clean metal. Remember to wear gloves, eye protection and a respirator. This will create a lot of dust and grime so make sure to work outside and be gentle — you’re trying to remove the grease, not the metal.
Step 7: Remove Old Paint

Removing old paint from a grill by hand is tough and you should avoid using chemical strippers. Installing a paint/rust removal disc (commonly called a “flap disc”) on your angle grinder makes removing old paint a breeze. Make sure to wear protective gear and be sure to work outside. Use the flap disc only on painted surfaces — do not use it on any powder-coated, aluminum or stainless steel surfaces.
Step 8: Polish or Scrub Non-Painted Surfaces

Our grill has an enameled surface so it only needs to be scrubbed with a mild detergent. If your grill is aluminum or stainless steel, you’ll want to use a cleaner or polish that’s specifically made for that material. Make sure to use a water-based cleaner and remove any chemical residue before lighting your grill.
Step 9: Repaint Metal Surfaces
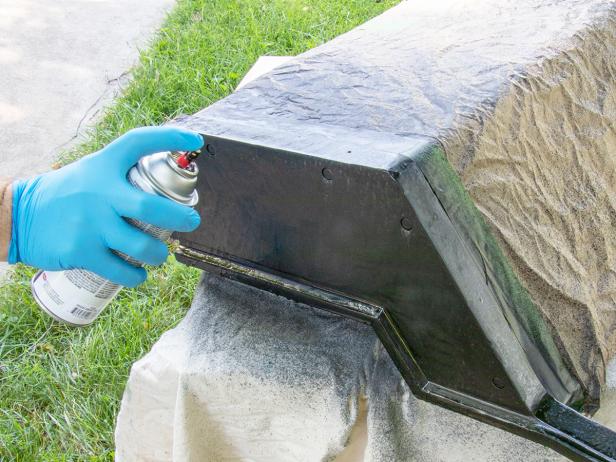
Because your grill reaches extreme temperatures, you’ll need to use high-temperature spray paint that’s specifically designed for grills. Be sure to carefully cover any areas you don’t want to be painted. Also, do not spray paint any parts of your grill that come into contact with flames and do not paint the inside of the lid. This will keep paint flakes from falling into your food.
Step 10: Re-Install Ignition Switch

After you’ve painted the grill you can begin installing your new parts. Start by installing the ignition switch through the side of the grill, making sure it faces toward the location of the first burner tube.
Step 11: Install New Burner Tubes

Install the new burner tubes according to the manufacturer's instructions and make sure they’re held securely in place. You’ll want to ensure that they won’t wiggle loose when you move or bump the grill.
Step 12: Re-Install Gas Valves + Regulator Hose


When the burner tubes are in place, re-install the gas valves. Double-check to make sure that they’re all still turned to the off position and then tightly secure them in place.
Use an adjustable wrench to screw the new regulator hose onto the gas valve assembly. You’ll want to use some Teflon tape to make sure that you have a good seal so that no gas escapes when you connect the propane bottle.
Step 13: Replace Control Panel + Gas Knobs

Re-install the control panel and any knobs or accessories that go along with it. Make sure that it’s tightly secured and that it won’t move or accidentally come off while you’re grilling.
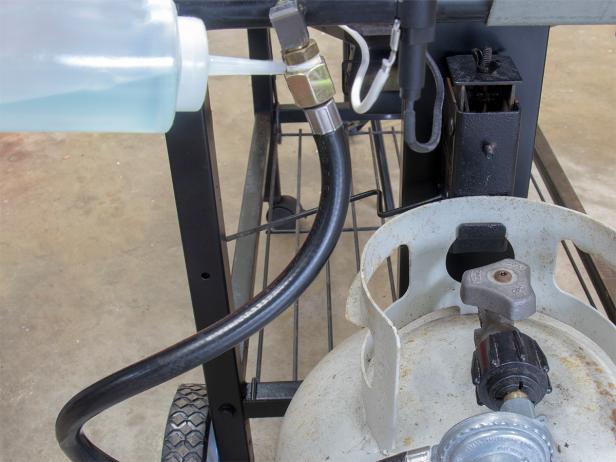
IMPORTANT - Testing for Leaks
After you’ve connected the gas line and all of the controls, you’ll want
to test for leaks. Using a small bottle of soapy water, squirt some liquid
onto any gas connections and then open up the propane tank. If you see
any bubble coming out at the connection, or if you smell any gas at all,
shut off your tank, re-tighten your connections and continue to test until
the leaks are gone. DO NOT EVER ATTEMPT TO TEST FOR LEAKS WITH
AN OPEN FLAME.
Step 14: Test Burner Tubes

When you’re satisfied that you have addressed any leaks, check that all of the burners are igniting properly. Following the manufacturer's instructions, light the burners one at a time and let them heat up for a little while to ensure that they stay lit with no issues.
Step 15: Re-Install Burner Guards + Grates


Turn off your grill and let it cool to a safe temperature, and then install your burner guards. These keep food and grease from dripping into your burners and should be replaced any time they start to show signs of excessive rust or fatigue. With the burner guards are back in place, re-install the cooking grates and make sure that they fit securely in place.
Step 16: Oil the Inside + Heat It Up
Now that your grill’s insides are all clean and refurbished, you’ll want to season it. Lightly spray the burner guards, the grill grates, and the inside of the lid with canola or similar vegetable oil. Heat the grill to around 500 degrees Fahrenheit and let it stay hot for about 20-30 minutes before turning off the gas. Leave the lid closed and allow the grill to cool off.

Step 17: Repaint + Refinish Exterior Parts
Refinish any wooden parts or repaint plastic parts on the outside of your grill that are showing signs of wear. Once your grill has been seasoned and you’ve painted any remaining exterior parts, you’re ready to grill out.


