


How to Plant and Grow Sweet Potatoes
Sweet potatoes come in two forms: vining and bush varieties. Both types thrive in the hot summer sun and are relatively easy to grow if given the right spacing and soil.

Debbie Wolfe
Sweet potatoes aren't started by seed like most other vegetables, they're started from slips. Slips are shoots grown from a mature sweet potato. Learn how to grow and when to harvest sweet potatoes and also how to cure your sweet potatoes after the harvest.
Step 1: Start the Slips
You can order slips from a mail order or Internet catalog or you can start slips from a sweet potato you bought at the store or one from your garden. If you buy a potato from the store, be sure to find out if you're getting a bush type or a vining type. Bush types are still vining, but much shorter than those considered to be vining types.

Top 10 Varieties of Sweet Potatoes to Grow 11 Photos
There are hundreds of varieties of sweet potatoes grown around the world. We've narrowed the list down to the top performers for your backyard.
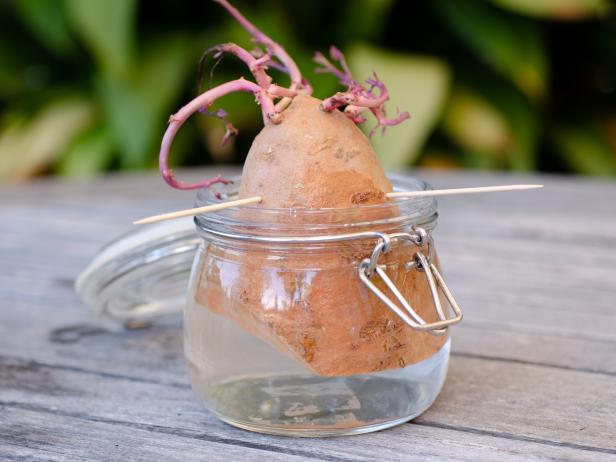
To start your slips, you need several healthy, clean sweet potatoes. Each sweet potato can produce up to 50 slip sprouts. To create sprouts, carefully wash your potatoes and cut them either in half or in large sections. Place each section in a jar or glass of water with half of the potato below the water and half above. Use toothpicks to hold the potato in place.
shutterstock/Cmspic
Start your slips by placing sections of mature sweet potato in a jar or glass of water with half of the potato below the water and half above. Use toothpicks to hold the sweet potato in place.
The slips need warmth, so put them on a window ledge or on top of a radiator. In a few weeks your potatoes will be covered with leafy sprouts on top and roots on the bottom.
Step 2: Root the Slips
Once your sweet potatoes have sprouted, you have to separate them into plantable slips. To do this, you take each sprout and carefully twist it off of the sweet potato. Lay each sprout in a shallow bowl with the bottom half of the stem submerged in water and the leaves hanging out over the rim of the bowl.

Shutterstock/EQRoy
Within a few days roots will emerge from the bottom of each new plant. The new slips are ready to plant when the roots are about an inch long. To keep your slips healthy, be sure to keep the water fresh and discard any slip that isn't producing roots or looks like it's wilting.
Step 3: Prepare the Soil for the Slips
Before you plant sweet potato slips, you have a little extra work to do. Sweet potatoes need loose, well-drained soil to form large tubers. You don't want the roots to face resistance when they try to expand within the soil. Loose soil is more critical than almost any other factor when it comes to growing sweet potatoes successfully.
Step 4: Plant the Slips
Plant slips in prepared soil with the roots pointing down. Position the slip so that the bottom half will be covered with dirt while the top half with all of the new leaves is above ground.
How to Grow Sweet Potatoes in Containers
Short on garden space? You'll be happy to know sweet potatoes can be grown in flower pots.
Be careful not to bruise the new plant. Sweet potatoes don't like to be bruised or bumped around too much. Gently press the surrounding dirt to set the plant and to remove any remaining air pockets. Continue the same way until all of your slips are planted.
A Note on Spacing
Sweet potato plants spread and quickly cover an area, and they will root into the soil at leaf nodes. Bush types may be 3 feet long while some vining types get up to 20 feet long. Space your plants accordingly. It's generally recommended to space slips 12-18 inches apart.
Step 5: Water, Water, Water
Water the slips once all of the slips are in place. You'll need to give them a thorough soaking until all of the surrounding dirt is wet. New plants, like slips, need to be watered every day for the first week and every other day the second week.
Each week the waterings can happen a little further apart until you're watering once a week. If the ground is very dry or you've had a lot of rain, you may need to adjust this schedule in your own garden. Sweet potatoes can withstand drought but they'll produce less, so make sure you water them during the hottest part of the summer.
Step 6: Harvest
When to harvest sweet potatoes will depend on the cultivar that you purchased. When receiving your slips, it is important to read the packing. Typically, most varieties will take about three to four months to mature – about 90 to 120 days, but there are some newer varieties that take less time and are bred specifically for short-season northern climates (such as Georgia Jet, Vardaman, Centennial).
Shutterstock/Alexander Knyazhinsky
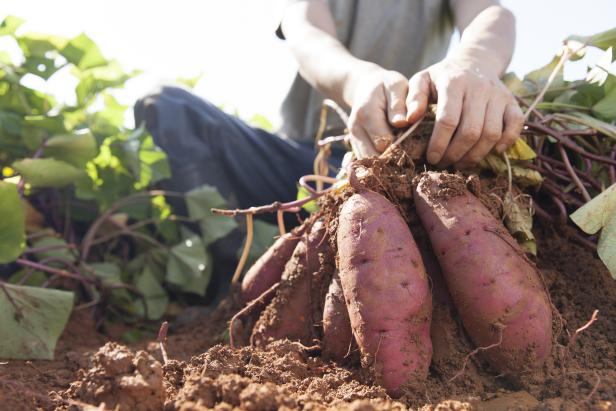
Be careful not to damage sweet potatoes when harvesting as by hand as even minor damage can lead to spoilage.
While some varieties grow better in northern gardens, it is important to harvest your sweet potatoes prior to any frost or freeze, no matter where you live. If you have a shorter growing season, your potatoes may be smaller in size but will still have the same wonderful taste as larger spuds. Watch the weather report and harvest your sweet potatoes when the night time temperatures start to dip into the 40s to 30s to ensure that none of your crop is lost to frost. The longer you are able to keep the plants in the ground, the larger and more numerous your harvest will be.
With southern gardens, try to keep your potatoes in until 120 days since typically cold nights and frost will not be a problem. With sweet potatoes, there is really no sign as to when they are ready like with "white” or "Irish” potatoes when the stems or vines start to die back. Sweet potatoes will continue to grow and produce until frost or freeze stops them.
Digging your sweet potatoes up is extremely easy, but will take some heavy lifting and back muscle. Wait for a day when the soil is dry. Using a shovel or a pitchfork, gently lift the soil. Be careful to do this in a gentle manner, so that the potatoes do not become damaged by bruising or piercing the skin. Even minor damage can lead to spoilage.) Use your hands to pull them out of the ground, shaking off the dirt as you free them.
Since it has taken 120 days to harvest, it is important that you reap the entire yield.
Step 7: Cure the Sweet Potatoes
Once you have harvested all your sweet potatoes, it is time to cure them. Leave the newly dug potatoes to dry in the sun and fresh air for a few hours. Then store them in a box lined with newspaper and keep them in a spot that gets good air circulation for a couple of weeks. The ideal temperature for letting them continue to dry, or cure, is 85 to 90 degrees.
Next, move the sweet potatoes to a location where the temperatures are cooler — between 55 and 60 degrees (like a root cellar, if you have one). An ideal humidity would be 75 to 80 percent. Check the sweet potatoes regularly, and discard any that show signs of spoilage. Properly cured, they should keep for several months.
Sweet Potato Recipes


Sweet Potato Recipes from Food Network
Whether you stuff, mash, roast or French fry them, sweet potatoes always end up delicious. Get Food Network's best sweet potatoe recipes.


