


55 New Ways to Upcycle Your Old Stuff 55 Photos
The best things in life are (nearly) free. Instead of tossing your old stuff, try one of our project ideas to upcycle it into something new.
More Upcycling

28 Crafts You Can Make With Old Clothes 28 Photos
Give your favorite sweater, T-shirt, baby onesie or blue jeans a new lease on life with these imaginative upcycling projects.

Tour Kevin Copeland's CARGO By KVN Shipping Container Home in Atlanta 22 Photos
Builder Kevin Copeland's "hybrid house" proves that a shipping container can have more than one purpose — and could be an innovati …

Halloween Decor: How to Make Creepy Apothecary Jars Oct 24, 2023
Take your Halloween decor to the next level with these easy-to-make apothecary jars made from recycled medicine bottles.

How to Make a Halloween Night-Light From a Plastic Bottle Oct 20, 2023
Let your kids illuminate Halloween by crafting a witch night-light made from an upcycled 2-liter bottle.
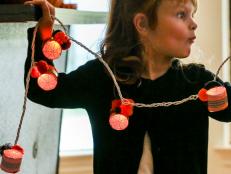
How to Make Halloween String Lights on the Cheap Oct 20, 2023
The secret to making them on the cheap? Toilet paper rolls. If you or your kids can use scissors and decoupage glue, you can make …

How to Make Terrazzo-Style Candles From Crayons Oct 20, 2023
Don't toss those broken crayons. Instead, upcycle them into colorful candles.
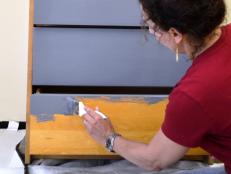
Can You Paint Over Stain? Apr 7, 2023
Yes, you can paint over stained wood with the right prep and the right type of paint. Learn how to figure out the best method and …

Meet the Austin-Based Clothier Who Upcycles Vintage Quilts and Fabrics Into Custom Clothing Apr 20, 2023
Nothing goes to waste at Psychic Outlaw. Rebecca Wright has turned quilts and other abandoned fabrics destined for the landfill in …

Karen E Laine's Most Creative Designs 21 Photos
Someone else’s trash is definitely Karen’s treasure. We’re deep diving into her best reclaimed designs and DIY ideas — which she c …

Upcycled Flannel Holiday Gift Wrap Nov 15, 2022
Start saving those empty dry-good containers now to upcycle into festive fabric-clad packages that can be used again and again.

Upcycle an Old Cake Pan Into a Christmas Candle Ring Centerpiece Sep 26, 2022
Got a past-its-prime Bundt or tube cake pan taking up space in your cabinet? In just a few steps, you can upcycle it into a cheery …

Create Upcycled Halloween Planters Using Leftover Creepy-Crawly Toys Oct 21, 2022
Toy worms, bats and spiders are put to good use in this arguably super-cute, Halloween embossed planter.

DIY This Moody, Mossy Living Dead Succulent Wall Planter Oct 21, 2022
Snag a thrift store frame, some succulents, moss and glue to make this upcycled, scary-meets-stylish succulent wall planter perfec …

Quickly Craft These Christmasy Taper Candle Rings Sep 16, 2022
Give your everyday taper candles a holiday makeover in just a few minutes by dressing up plain napkin rings with hot glue and faux …
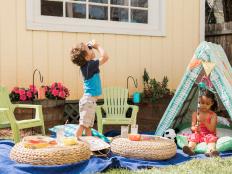
30 Outdoor Activities for Kids 30 Photos
Get the little ones off their screens and into the great outdoors with these easy activities and fun projects you can do as a fami …

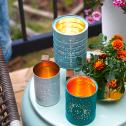
Outdoor Upcycles: 60 Ways to Reimagine, Repurpose + Recycle for a Beautiful Yard on a Budget 60 Photos
(Almost!) free is fantastic when you freshen up your great outdoors with our ideas for landscape, hardscape, gardening, entertaini …

How to Upcycle a Cutting Board Into an Address Plaque Jun 17, 2022
Is your cutting board a bit too small to make the cut? No problem. In just a few steps, you can upcycle it into a stylish stand-in …
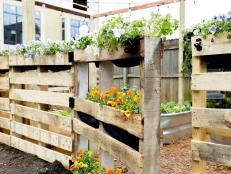
How to Make a Garden Fence From Upcycled Pallets Apr 30, 2024
Keep critters out of your garden with this inexpensive fencing alternative that can also serve as planters.
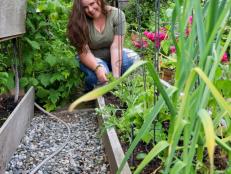
Regenerative Gardening Projects With Stephanie Rose 9 Photos
In her new book The Regenerative Garden, blogger, master gardener and disability advocate Stephanie Rose shows readers how to crea …

74 DIY & Upcycled Headboard Ideas 74 Photos
Give your boring bed frame a boost with one of these budget- and beginner-friendly headboard projects and DIY design ideas.

Turn an Old Tomato Cage Into a Storage Basket May 9, 2022
Make a colorful, fabric storage basket out of a tomato cage and cotton twine with this simple and super-affordable tutorial.

Turn an Old Laundry Detergent Pod Container Into a Moon Planter for Succulents May 9, 2022
This trendy, DIY upcycled moon planter is surprisingly easy to make out of an old laundry pod container. No one will believe that …

50 Brilliant Upcycling Projects From HGTV Stars 51 Photos
Repurposing a Mason jar as a drinking glass is nifty and all, but have you seen a midmod concrete planter repurposed as a sink? Be …

How to Make a DIY Upcycled Bookend Vase From an Old Cereal Box May 9, 2022
This trendy DIY upcycled bookend vase looks like clay, but it’s actually made of cardboard! Transform an old cereal box to give yo …
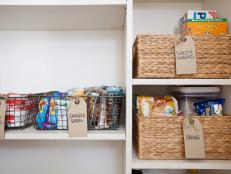
31 Ways to Maximize Your Pantry Space 31 Photos
When cupboards are a jumbled mess, finding ingredients can take as long as cooking dinner. Keep even the smallest pantry organized …

How to Paint an Abstract Landscape Design on a Dresser Jan 18, 2022
Learn how to revive an old piece of furniture by refinishing it in a colorful trompe l'oeil-inspired design.

How to Paint a Retro Floral Design on a Dresser Jan 13, 2022
See how we used ice cream sticks to give an old dresser a funky 1970s-inspired look.

How to Turn a Dresser Into a Combination Pet Bed and Nightstand Jan 12, 2022
We gave one old bureau two new purposes: stylish storage and sleeping space for pets.

How to Turn an Old Crib Into a Dog Crate Jan 12, 2022
Dog crates are expensive and are not usually very attractive. See how easy and inexpensive it is to upcycle a baby’s crib into a c …
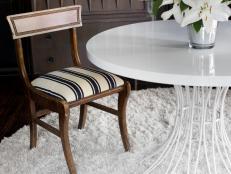
How to Re-Cover a Dining Chair With a Flat-Weave Rug Jan 10, 2022
Update seat cushions for little money by re-covering them with a pretty, patterned flat-weave rug.


